Pos : How to Protect Your Site With Two-Factor Authentication (3 Methods)
URL : http://wordpress.com/2021/10/14/protect-site-with-two-factor-authentication/
Ditulis : 14 Oktober 2021 pukul 1:01 pm
Penulis : The WordPress.com Team
Tag : 2FA, Two-Factor Authentication
Kategori : Security
When it comes to your website's security, you can never be too careful. Every precaution you take can add another layer of protection to your data. You've probably heard about how Two-Factor Authentication (2FA) can be one of these safeguards, but you might still be fuzzy on the details.
Fortunately, 2FA is a simple and effective solution that even total beginners can take advantage of. By understanding your options for using this tool, you can help keep your site safe from hackers.
In this article, we'll explain what two-factor authentication is and why it's a critical part of site security. Then, we'll give you a few tips on choosing the best 2FA plugin and walk you through three of our favorite methods. Let's get started!
What Two-Factor Authentication Is (And How It Can Protect Your Site)
Two-factor authentication adds an extra step to your login process. This means that besides entering a password to gain access to your account, you'll also need to enter a code.
This code may be accessible through an app, an email, a text, or another private avenue. However you choose to receive it, it will be unique to your account. It will also be randomized each time you request it. As such, no two users will have the same code.
* By doubling down on login credentials, 2FA goes the extra mile to prevent malicious actors from getting into your site. Even those who manage to get their hands on your password won't be able to receive the unique code.
* This security measure can also act as a kind of heads-up. If you receive a verification code you didn't request, there may be a malicious actor trying to get into your system. Armed with this knowledge, you can promptly change your password to securely lock them out.
* Moreover, adding two-factor authentication is a pretty simple process. Hacks can steal sensitive data and damage your reputation. You can avoid all of these dire consequences with just a few simple clicks.
As you can probably see, there are plenty of compelling reasons to protect your site with two-factor authentication. Nevertheless, no single precaution can fully protect you. We highly recommend that you use 2FA alongside other security measures ( https://wordpress.com/go/web-design/four-website-security-tips-everyone-can-use/ ) , such as choosing a strong password and screening for spam ( https://wordpress.com/go/website-building/what-is-spam-and-how-do-you-prevent-it/ ) .
Tips for Choosing the Right 2FA Plugin for Your Site
One of the easiest ways to add two-factor authentication to your site is with a plugin. These tools are often convenient and free. There's also a huge number of them, making it more likely that you'll be able to find your perfect match.
Despite this benefit, the sheer number of options can also make it hard to choose. If you're looking to pick out your own 2FA plugin, there are a few factors you can check for to help you decide.
Multiple Verification Methods: For example, one of the most important elements to consider is how many methods of verification a plugin offers. Some will offer a huge selection of ways to verify your account. They may also enable each user to opt in or out. On the other hand, some plugins may rely on just a single verification app. If not all your users own a smartphone, this could pose a problem. We recommend keeping an eye out for this feature if having plenty of options matters to you.
Trouble-Free: Another aspect worth considering is the ease of use. Two-factor authentication is a powerful tool, but it also creates the possibility of getting locked out of your account. Clearly worded instructions that come with emergency access codes can help narrow your chances of running into this issue.
Reliable: Finally, consider taking a look at the plugin's general reviews. High numbers of downloads, resolved support tickets ( https://wordpress.com/go/customization/best-wordpress-helpdesk-plugins/ ) , and positive feedback are usually promising signs of an effective plugin. Try to look at the update frequency, too – regular patches are a key part of plugin security.
How to Protect Your Site With Two-Factor Authentication (3 Methods)
If you'd rather skip the search, we've narrowed it down to three options. In this section, we'll walk you through how to set up each of these high-quality solutions.
Method 1: WordPress.com and Jetpack ( http://jetpack.com )
If your site is hosted by WordPress.com, you probably already know that optional 2FA is just one of many built-in Jetpack features ( https://wordpress.com/go/tutorials/what-does-the-jetpack-wordpress-plugin-do-infographic/ ) . If you're working with a different host and still want to use this method, the stand-alone Jetpack plugin will do the trick, too.
Step 1: Turn on Two-Factor Verification
First things first, you'll need to enable 2FA for your site. This has to be done before you can adjust any other settings.
We should also mention that this only offers other users the option to use 2FA. It won't require them to turn it on. As such, consider reaching out to other admins and users about implementing this security tool as soon as possible.
To get started, navigate to your WordPress dashboard. Then, go to Jetpack > Settings. Scroll down to the bottom of the page and find the WordPress.com login box:
https://wpcom.files.wordpress.com/2021/10/wordpress.com-login-settings-jetpack.png Make sure the topmost switch is set to the blue on position. You'll also need to enable the Require accounts to use WordPress.com Two-Step Authentication option.
While you're here, you may also want to do the same for Match accounts using email addresses. This will confirm that the entered username is connected to the user's email address. Make your choice, then save your work and continue to the next step.
Step 2: Add Your Verification Method
Next up, it's time to configure your personal settings. Begin by heading over to the authentication page ( https://wordpress.com/me/security/two-step ) and clicking on Get Started:
https://wpcom.files.wordpress.com/2021/10/2fa-add-phone-number.png As you can see, you'll need to enter a phone number. However, that doesn't mean that you need to stick to SMS as your primary verification method. You just need it for this first step and as a potential backup.
Once you've entered your phone number, you'll be able to choose between Verify via App or Verify via SMS. For the app route, you'll need a third-party verification app to move forward. We recommend Authy ( https://authy.com/ ) or Google Authenticator ( https://support.google.com/accounts/answer/1066447?hl=en ) .
If you choose to verify via SMS, you'll automatically get a text with a verification code. Simply enter it into the box that pops up and click on Enable. You'll then see a screen that looks something like this:
https://wpcom.files.wordpress.com/2021/10/wordpress.com-2fa-backup-codes.png We can't stress this next point enough: save your backup codes! Print them, save them to your computer or phone, and make sure to keep them safe. If you can't complete two-factor verification for any reason, these will be your last lifeline to get back into your account.
As soon as you've stowed your codes away, you can complete the process by clicking on All finished!. That's it – 2FA should now be in place for your account. If you ever decide to disable it, simply go back to the authentication page and select Disable two-step authentication.
Method 2: Two Factor Authentication ( https://wordpress.org/plugins/two-factor-authentication/ )
Next up is a plugin from the same team that made UpdraftPlus ( https://wordpress.org/plugins/updraftplus/ ) ; Two Factor Authentication ( https://wordpress.org/plugins/two-factor-authentication/ ) . The developers offer a premium version ( https://www.simbahosting.co.uk/s3/product/two-factor-authentication/ ) , but we've opted to use the free one for this walkthrough.
Step 1: Calibrate Site-Wide Settings
Once you've added the plugin to your site, head over to Settings > Two Factor Authentication. That should lead you to a dashboard that looks similar to this one:
https://wpcom.files.wordpress.com/2021/10/two-factor-authentication-admin-settings.png If you scroll down, you'll see a few other settings that are exclusive to the premium version. These include things like requiring users to set up 2FA or adding a trusted device that can bypass it. However, we'll just be focusing on the free ones for now.
At the top, you'll see a section titled User roles. This will determine who gets the option to add 2FA to their account. Make your choice, click on Save Changes, and move on to the next step.
Step 2: Add Your Personal Two Factor Authentication Settings
Now that you've activated site-wide settings, you can get started on your personal ones. From the left of your dashboard, click on the Two Factor Authentication symbol. You should see a new screen with personal settings:
https://wpcom.files.wordpress.com/2021/10/two-factor-authentication-personal-settings.png Switch your selection to Enabled and click Save Changes. You'll then need to use an authenticator app to complete the process.
You can choose between the TOTP method or the HOTP method. TOTP resets after a certain amount of time, while HOTP will reset depending on certain events. Most authenticator apps rely on TOTP, but you're free to use whichever you like.
Unfortunately, the emergency recovery codes are a premium feature for this app. Thus, if that peace of mind is important to you, you may want to opt for a different solution.
Method 3: Wordfence ( https://wordpress.org/plugins/wordfence/ )
We'll finish things off with Wordfence ( https://wordpress.org/plugins/wordfence/ ) . Wordfence is one of the top plugins to know ( https://wordpress.com/go/tips/six-wordpress-plugins/ ) , and for good reason: over four million people ( https://www.wordfence.com/blog/2021/01/the-wordfence-2020-wordpress-threat-report/ ) use it to protect their site. While it's primarily a security scanner and firewall provider, it also offers two-factor authentication features that are worth considering.
Step 1: Set Up Site-Wide Two-Factor Authentication
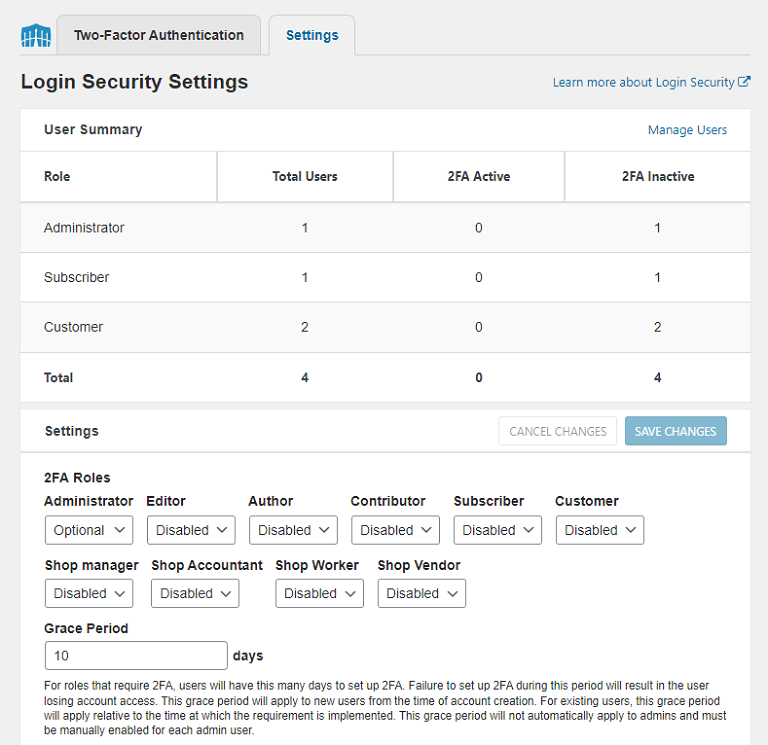
First, you'll want to access the general settings. You can do so by going to Wordfence > Login Security > Settings. There, you'll find a dashboard with a large number of settings:
https://wpcom.files.wordpress.com/2021/10/wordfence-site-settings.png Try not to be intimidated by the sheer amount of options! You don't have to worry about them all. As for the ones you should pay attention to, let's start at the top with 2FA Roles.
Here you can toggle 2FA requirements for all your user roles. You have three choices: optional, required, or disabled. Requiring 2FA is more secure, but users who miss the grace period may end up locked out of their accounts. As such, consider plenty of active reminders if you choose this path.
Another option you have is to whitelist certain IP addresses. For example, if you want to turn off 2FA for just yourself, you could enter your IP in the box and not have to worry about it.
However, this also takes away the benefits of 2FA. If you want to use this feature, consider whitelisting a single device to act as a backup just in case you ever get locked out.
The rest of the default settings should be fine. If you'd like to go through them yourself, feel free to do so before moving on to step two. Just remember to click on Save Changes first.
Step 2: Set Up Your Own Account
Next, stay on that same page and click over to the Two-Factor Authentication tab. There, you'll see a few options to tailor your personal settings:
https://wpcom.files.wordpress.com/2021/10/wordfence-personal-settings.png From here, all you have to do is use your authenticator app to scan the QR code. Like in the first method, you'll also want to make absolutely sure you've stored the recovery codes in a safe place. There are six codes and each one can only be used once.
Once you've done that, enter the code provided by your authenticator app and click Activate. Your account should now be verified and you should have 2FA all set up next time you log in.
Conclusion
Security is an essential part of any website. With so many possible ways to protect yourself, it can be hard to know where to start. Fortunately, you can protect your site with two-factor authentication in just a few clicks.
In this article, we showed you three different ways to add 2FA to your WordPress website:
* Use WordPress.com's built-in Jetpack features ( https://jetpack.com/ ) .
* Choose the Two Factor Authentication ( https://wordpress.org/plugins/two-factor-authentication/ ) plugin for a simple solution.
* Use Wordfence ( https://wordpress.org/plugins/wordfence/ ) for granular control over your user roles.
--
Kelola Langganan
https://subscribe.wordpress.com/?key=2cf92d447d6bf5230bc38c58c02d8eb0&email=jabatek77.internet%40blogger.com
Berhenti berlangganan:
https://subscribe.wordpress.com/?key=2cf92d447d6bf5230bc38c58c02d8eb0&email=jabatek77.internet%40blogger.com&b=OVgpInRLmUP5YZbeVMr-g8jIPvIXGr7r6Accokdj8ZFNOZ5lRzZupBvDm3cIhVRDQrhZ44qj659CATIrma2WYraqP7PiHHp80WALDeNCpbSQvA%3D%3D
Langganan:
Posting Komentar (Atom)

Tidak ada komentar:
Posting Komentar